Showing posts with label Quilting. Show all posts

Saturday, December 31, 2022

Happy New Year!

 Out with the old, in with the new. Are you ready for the new year? Are you ready for 2022 to leave? This past year wasn't as bad as 2020 and 2021. Hopefully next year will be even better for all of us!

This years finishes are few, but I do have finishes!

There are a bunch of links (they will open to a new tab), most free and I'm not affiliated at this time to any.

In quilts, Valentine's Day wall hanging, Oh My Stars table runner and I finally finished the Jelly Snowflake from last year... or was it the year before!? I still have to hide the stitches from the problems I had with my quilting machine. But I can get nice and cozy will I do that. Here's a picture of it, I'll have a better when when I'm finished with the thread mess.

I completed a flimsy of the String Bean quilt from Pat Sloan's block a day in March. She does this every year. I believe this was her third year and she is talking about 2023's block, or at least trying to decide which block would be good. She picks an easy block, beginner friendly and easy to keep up. I don't think I have a picture of it yet, but I will post one as soon as I get one.

Other projects are; several cloth napkins, Tilda Duck from Tilda's Hot Chocolate book and fabric eggs. I finished another Rhapsody shirts from Love Notions and in the crochet department I made the Chill Time cardigan.

For Cross Stitching I finished Chicken Love, Stitches in aquas and Little Quaker Christmas.

The Love Chicken pattern is free from Fat Quarter Shop. Head there for that and other patterns.

Stitches and Little Quaker Christmas are free patterns from Aurifil <follow that link to their site of not only these two but a bunch of cross stitch patterns that are free!


I have several QALs I've started this year, you have to add to the WIPs! Most are Pat Sloan's QALs including Sweet Dreams (4 blocks left), another String Bean Block A Day (10 blocks left), Summer Camp (all blocks done), Hometown Charms (3 blocks left). A couple through Fat Quarter Shop that I started but haven't quite finished are FlapJacks and Christmas Time Mystery QAL both are free quilt a longs. The Christmas Time mystery link will take you to a page that also has the cross stitch patterns, they are patterns are separate so you'll have to go to several pages.

I also started a pattern I designed and hope to get that up and available for you. 

That is basically my year in crafy review. This didn't include my drawings because I didn't track them, but I will from now forward! I'm hoping for more finishes next year, but then aren't we all!

The very best New Year to all! Love Y'all and thanks for stopping by!

Sheila

Thursday, December 22, 2022

Hi Y'all! And Merry Christmas!!!

 I know it's been way too long! I've been feeling off and overwhelmed, but I'm much better now! :D 

I've been tending the chickens and it sparked my love of drawing...

This is Dorothy she's a Mystic Marans. I'm still working on her, but wanted to share what I have done so far. I use mostly Prismacolor pencils on Cansons paper. I've been trying different types of colored pencils, Faber Castell for one. I use to do pet portraits and absolutely loved it. I plan on starting a youtube channel for those who want to learn about drawing and using colored pencils. Hopefully that will start the beginning of the year.

I haven't given up on quilting in case you are wondering! I just finished up on Pat Sloan's 'Oh My Stars' table runner. Something quick and easy to get me back on track. I'm also trying to finish up on her Hometown Charms QAL. The end of a QAL always has me dragging my feet! 

The table runner was easy to quilt, except my machine was acting up again. But even with the problems, it only took me an hour and half to quilt it. So here it is...

I had an issue with attaching the binding ends together and after 3x's I decided it just didn't matter! Of course the red flange really draws the eye to the misalignment. Even though I still like how it came out and I'm very happy with it. It fits on the coffee table perfect. Here is the back, which I think that side can be used as the top too!

 Here is a close up of the quilting. Notice the holly leaves and snowflakes, I had fun!

I hope you are enjoying the season. We are getting the arctic blast right now as I type! So I better get this uploaded before we lose power!

Merry Christmas all!

Sheila


Tuesday, June 29, 2021

My OMG Finished Early And A Tutorial On Binding

 I'm so happy to say I finished my OMG!!!! Early in fact! I also took the time to take photos so I could give a tutorial on binding a quilt. I know, I know there are so many tutorials out there but It seems to be the one thing that people are looking for the most. And since I don't put binding on near enough to remember, having it posted here will help me find it easier!!! 😆

Here is my finished Out Of This World Quilt bound and ready for college! 

Check others finishes by heading to Elm Street Quilt!


This post is heavy with photos in hopes to help you as much as possible.

From the very first quilt I made I have done the binding with a flange, extra color is always a good thing!!! It's also done with the sewing machine...no hand sewing! I'm not good at hand sewing (but I'm working on it this year!) and I want to get the quilts done as fast as possible so I can get on with the next one!

I had the binding already done so I don't have photos of the making of that, but it's two strips the wider one is the flange color and the narrow is the binding. The flange is 1 3/4" and the binding is 1 3/8" sewn together the length of the strips. Iron the flange up to the outer binding. Fold your binding, wrong sides together and have the raw edges line up, iron to give it a crease and hold the fold. Your flange should be peeking out when looking at the top of the binding. 

The dark blue fabric is the outer part of my binding and the orange is the flange.

Starting at the middle edge of the quilt and having a tail of about 8" to 12" of the binding free (you'll need it to attach it to the other end) lay the outer part of your binding (raw edge) to the backside raw edge of your quilt. What you see is the flange and the back of my quilt. I use clips to hold it all the way around the quilt.


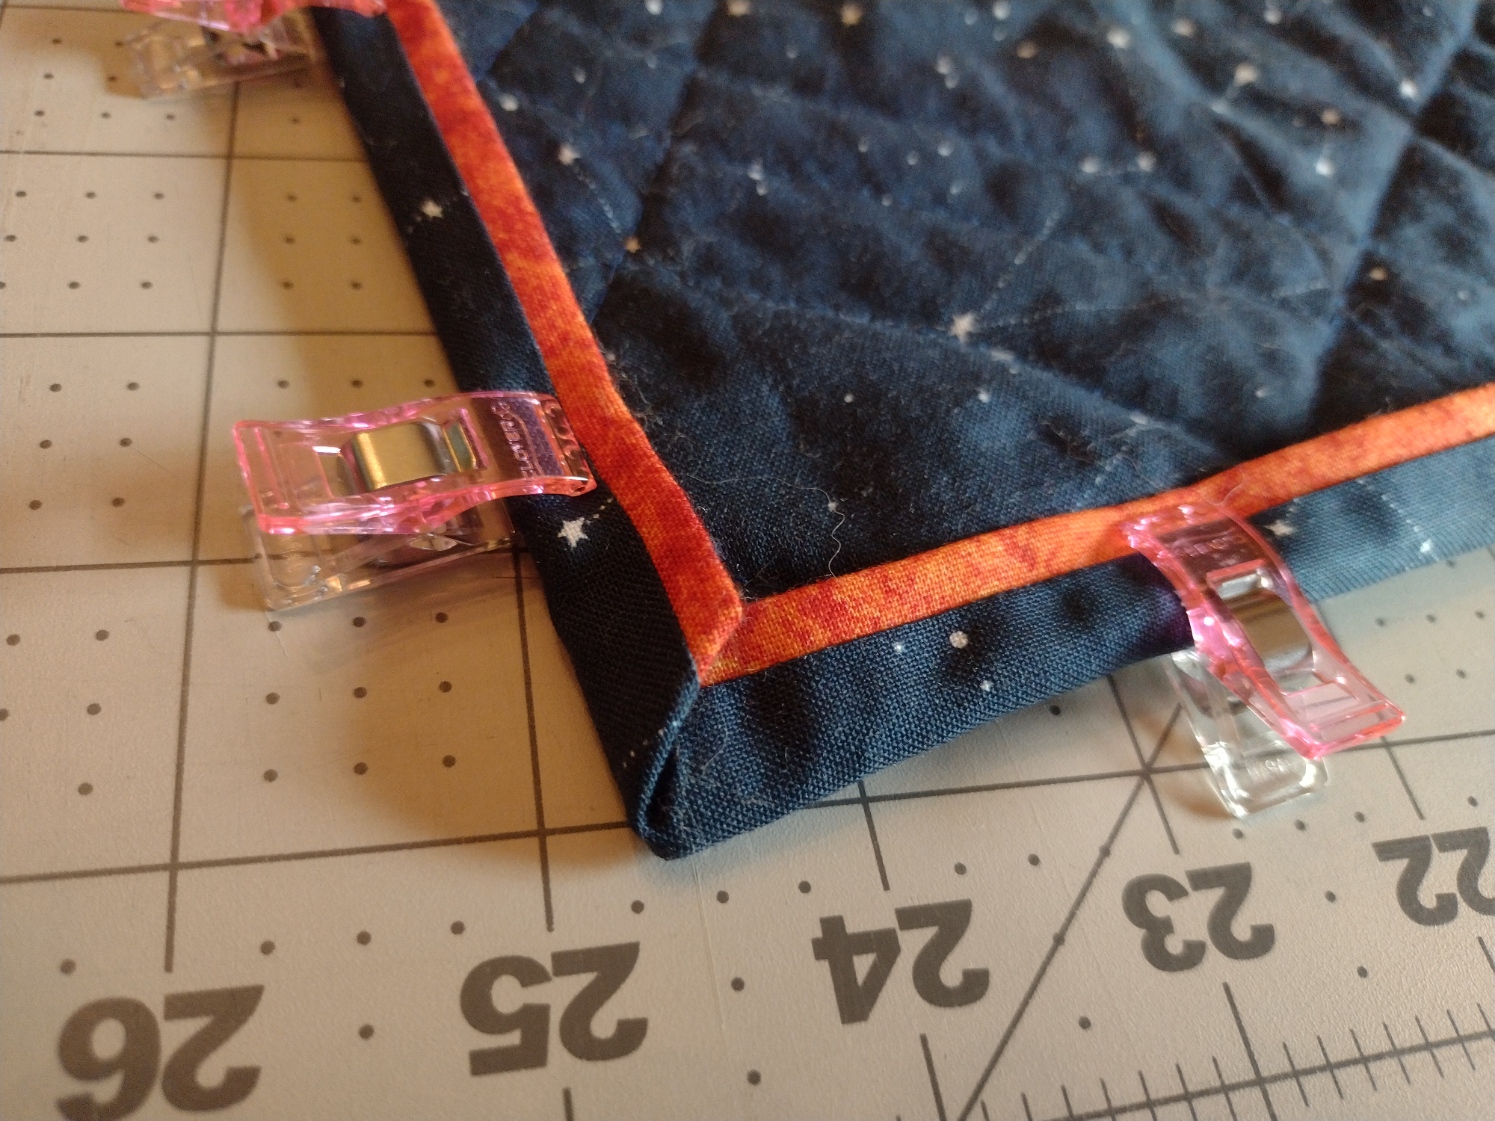
At the first corner (actually all the corners!) you fold the binding so that it is even with the edge of the quilt and crease the 45 degree fold.

Then you fold it back so that the next fold is even with the first edge of the quilt.

See how it the binding follows the quilt>>>

Below I show how I use the clips to hold the corner in place.


 Continue around the quilt doing the other 3 corners the same way.


 With the binding clipped on and having a gap between where you started and ended attaching the binding, about 12" you should have extra binding on both ends. Starting around where the clip is, sew the binding to the quilt using 1/4" seem allowance and back stitch in the beginning and end. Remember don't sew the gap to give you room to work on attaching the ends.

 Now here is the part that I need a refresher every time I bind a quilt! Attaching the ends!!!

  Cut a section off (it doesn't have to be very big). We are going to use the piece to give us the width of the binding and help connect the ends.

Lay the tails of the strips over each other (the bottom strip is peaking out to know where it is) and unfold the piece you just cut off. Place it vertically (notice the fold) over the two strips.>>>

One end of the piece will line up with the bottom  strip that is peaking out. 


You will cut the top strip where the other end of the piece is...Be sure to cut the top strip and not the bottom!


<<<Here is the binding after cutting the strip. The cut piece is laying on top to the right.


 Unfold the binding end and fold the one end 45 degree so that the top corner folds down to the edge. Finger press to make a crease. Notice that your outer binding is the small triangle at the top.

Open up the binding ends and pin the top flange corner to the top main binding corner, right sides together.

Notice where my fingers are pinched in the photo below.


To make sure you have it right before sewing, pin along the crease and open. The binding should line up.


I use clips to hold the binding in place.


Sew along the crease. Notice you are sewing like you sewn your binding together. If you see the binding is forming an "A", you are sewing the line that crosses the A! 


Notice the bottom corner is following the center line of the 1/4" washi...This stuff works great! I love it for HST!!!


The "A" is crossed! The other crease you see is when I did it wrong! Thank goodness I pinned first and fixed my mistake before sewing!!!!


Fold the binding back together and check that the flange is lined up and the binding fits against the quilt.


<<< I love when the flange lines up!!!


Unfold the binding again...


it's safe to cut the excess off.


 Then open seam and iron flat.


Lay flat against the quilt and continue/finish sewing the binding down.


Fold the binding over to the front of the quilt, clipping it down as you go around. You want the binding to be right up against the edge of the quilt.

To miter the corner fold flat past the corner.


Then finger press the other side over to give the nice finished corner. Clip to hold it in place.


Continue around until it's all folded over and ready to sew down.

Your top thread should match the flange color and the bobbin should match your backing. I'm using Aurifil #2277 Light Red Orange on top and #2783 Medium Delft Blue in the bobbin.


You will stitch on the flange close to the outer binding. On this quilt the flange is the orange and the blue to the right is the outer binding.


Sew all the way around until you come to the beginning.


And you are done!!! On to the next project! who am I kidding, I have several going at a time! Doesn't everyone!!!


I hope you find this technique useful! I would love to hear how you do yours and if you ever tried to do it all by machine.


This is the You Tube video I watch when I try and remember how to join the binding...

https://www.youtube.com/watch?v=P1srfubwAIQ&list=PLGlIVNYaoGssyqUp9ZHIiUmQBCei_J1XO&index=7

Thank you for visiting and I hope to see you again!

Sheila


Wednesday, March 31, 2021

My OMG Progress

Elm Street Quilts One Monthly Goal - March Finish Link-up

It doesn't look like I will be completing my snowflake quilt in time to use this winter, because my long arm has been giving me fits this month! I broke 2 needles and it's out of time again! I barely got started as you can see here...

This is the topside
And this is the bottom

I finished my son's space quilt though and I just need to bind it. That will be after hiding all the threads from the problems my machine was giving me!!! I love how the border quilting turned out! I used Sew Steady 1 1/2" spine ruler and put washi tape on it, lining up the edges of the border as seen here...

and here are some other pictures of the quilt, mostly of the back with inspector Mittens!

I love the happy moon face in this block!


Inspector Mittens. Everyone's a critic!

I think he approves! But then he is a cat and it is a quilt!

When I get the binding on I'll post the full quilt. Hopefully that will be sooner as opposed to later!


I'll have another post coming out after midnight...sorry for bombarding your email! I don't usually post that close together!!!

Sheila

Sunday, March 7, 2021

March's OMG, Block Count And What Is My Latest Finishes

First my OMG for this month is to finish my Jelly Snowflake. I have the binding made and the top, back and batting sandwiched together. I just need to quilt it and bind it and then we can use it! Hopefully we will be able to use it this season...our weather has become a little warmer lately. I'm sure we will have at least one more snow before the weather changes for spring, at least that's what I hope! 


I highly recommend joining in on the OMG! It's a great motivator and you have a chance to win some awesome prizes!

Elm Street Quilts One Monthly Goal March Link-up


I'm also linking to Quilting Gail and her PHD, another great project completer motivator! I didn't complete any projects in February, but I'm set up to have at least 2 finishes this month!!! I'm very excited about that!!! One of the projects I will be completing this month is the Jelly Snowflake (above) and I'm currently finishing up the quilting on my son's Out Of This World quilt that he will be taking to college this fall...yes my baby is heading for college this year! A whole lot of mix emotions going on there! 

Here is the space quilt under the needle. I used Aurifil 40/3 #2110 Light Lemon and 50 wt #2783 Medium Delft Blue in the bobbin. For the outer border I switched to 50 wt #2780 Dark Delft Blue since the material was so dark.

and this is the back of the quilt. It's my first time using Minky and I love the feel and the look of the quilting on it.

And here are my bullet journal pages and my sweet model Duke!

Here he shows the projects I started this year...well I haven't actually started The color challenge yet, but I will this month!

 I am also counting my blocks and posting them with Prairie Moon Quilts. This month I only finished 23 blocks. That gives me a year total of 55. Spending time quilting the above quilt took time away from making blocks, but you have to get the projects done!

That and I think I need to either fix one of my sewing machines or buy a new one. I'm using my hand crank one and while it does stitch nice and help me keep things straight, it does stitch slow and my shoulder blade has been aching. 


Isn't she a beauty! I took this when I first got her in 2019. She is a Singer model #99 and was "born" on Nov. 28 1928. To the right is Sigmund my sea green sea monster! I call him a monster for a reason...He's a heavy machine!!! He is a Singer 185j and was born sometime in 1954. I loved sewing on him, but I wore him out and now I can't get him to sew past a certain point without having to push the wheel, then it will stitch until he gets to that point again. I need to get him up and running again, he stitches beautifully and I miss sewing on him.

Here is a breakdown of my block totals...
Five blocks were from the Jelly Snowflake, six blocks are from Home Is... QAL and 12 are from my Star Dancer quilt. I hope to get caught back up this month. I think I'm on target so far, but then it is the beginning of the month anything can go wrong!

These are who I'm linking to...

Elm Street Quilts  OMG

Quilting Gail PHD

Lizzie Lenard Vintage Sewing Free Motion Mavericks

Prairie Moon Quilts The 350 Blocks Projects

Check out these blogs and play along... It's a great way to get projects done, be inspired and have fun meeting new people!

See ya later!

Sheila