Showing posts with label thread. Show all posts

Tuesday, June 29, 2021

My OMG Finished Early And A Tutorial On Binding

 I'm so happy to say I finished my OMG!!!! Early in fact! I also took the time to take photos so I could give a tutorial on binding a quilt. I know, I know there are so many tutorials out there but It seems to be the one thing that people are looking for the most. And since I don't put binding on near enough to remember, having it posted here will help me find it easier!!! 😆

Here is my finished Out Of This World Quilt bound and ready for college! 

Check others finishes by heading to Elm Street Quilt!


This post is heavy with photos in hopes to help you as much as possible.

From the very first quilt I made I have done the binding with a flange, extra color is always a good thing!!! It's also done with the sewing machine...no hand sewing! I'm not good at hand sewing (but I'm working on it this year!) and I want to get the quilts done as fast as possible so I can get on with the next one!

I had the binding already done so I don't have photos of the making of that, but it's two strips the wider one is the flange color and the narrow is the binding. The flange is 1 3/4" and the binding is 1 3/8" sewn together the length of the strips. Iron the flange up to the outer binding. Fold your binding, wrong sides together and have the raw edges line up, iron to give it a crease and hold the fold. Your flange should be peeking out when looking at the top of the binding. 

The dark blue fabric is the outer part of my binding and the orange is the flange.

Starting at the middle edge of the quilt and having a tail of about 8" to 12" of the binding free (you'll need it to attach it to the other end) lay the outer part of your binding (raw edge) to the backside raw edge of your quilt. What you see is the flange and the back of my quilt. I use clips to hold it all the way around the quilt.


At the first corner (actually all the corners!) you fold the binding so that it is even with the edge of the quilt and crease the 45 degree fold.

Then you fold it back so that the next fold is even with the first edge of the quilt.

See how it the binding follows the quilt>>>

Below I show how I use the clips to hold the corner in place.


 Continue around the quilt doing the other 3 corners the same way.


 With the binding clipped on and having a gap between where you started and ended attaching the binding, about 12" you should have extra binding on both ends. Starting around where the clip is, sew the binding to the quilt using 1/4" seem allowance and back stitch in the beginning and end. Remember don't sew the gap to give you room to work on attaching the ends.

 Now here is the part that I need a refresher every time I bind a quilt! Attaching the ends!!!

  Cut a section off (it doesn't have to be very big). We are going to use the piece to give us the width of the binding and help connect the ends.

Lay the tails of the strips over each other (the bottom strip is peaking out to know where it is) and unfold the piece you just cut off. Place it vertically (notice the fold) over the two strips.>>>

One end of the piece will line up with the bottom  strip that is peaking out. 


You will cut the top strip where the other end of the piece is...Be sure to cut the top strip and not the bottom!


<<<Here is the binding after cutting the strip. The cut piece is laying on top to the right.


 Unfold the binding end and fold the one end 45 degree so that the top corner folds down to the edge. Finger press to make a crease. Notice that your outer binding is the small triangle at the top.

Open up the binding ends and pin the top flange corner to the top main binding corner, right sides together.

Notice where my fingers are pinched in the photo below.


To make sure you have it right before sewing, pin along the crease and open. The binding should line up.


I use clips to hold the binding in place.


Sew along the crease. Notice you are sewing like you sewn your binding together. If you see the binding is forming an "A", you are sewing the line that crosses the A! 


Notice the bottom corner is following the center line of the 1/4" washi...This stuff works great! I love it for HST!!!


The "A" is crossed! The other crease you see is when I did it wrong! Thank goodness I pinned first and fixed my mistake before sewing!!!!


Fold the binding back together and check that the flange is lined up and the binding fits against the quilt.


<<< I love when the flange lines up!!!


Unfold the binding again...


it's safe to cut the excess off.


 Then open seam and iron flat.


Lay flat against the quilt and continue/finish sewing the binding down.


Fold the binding over to the front of the quilt, clipping it down as you go around. You want the binding to be right up against the edge of the quilt.

To miter the corner fold flat past the corner.


Then finger press the other side over to give the nice finished corner. Clip to hold it in place.
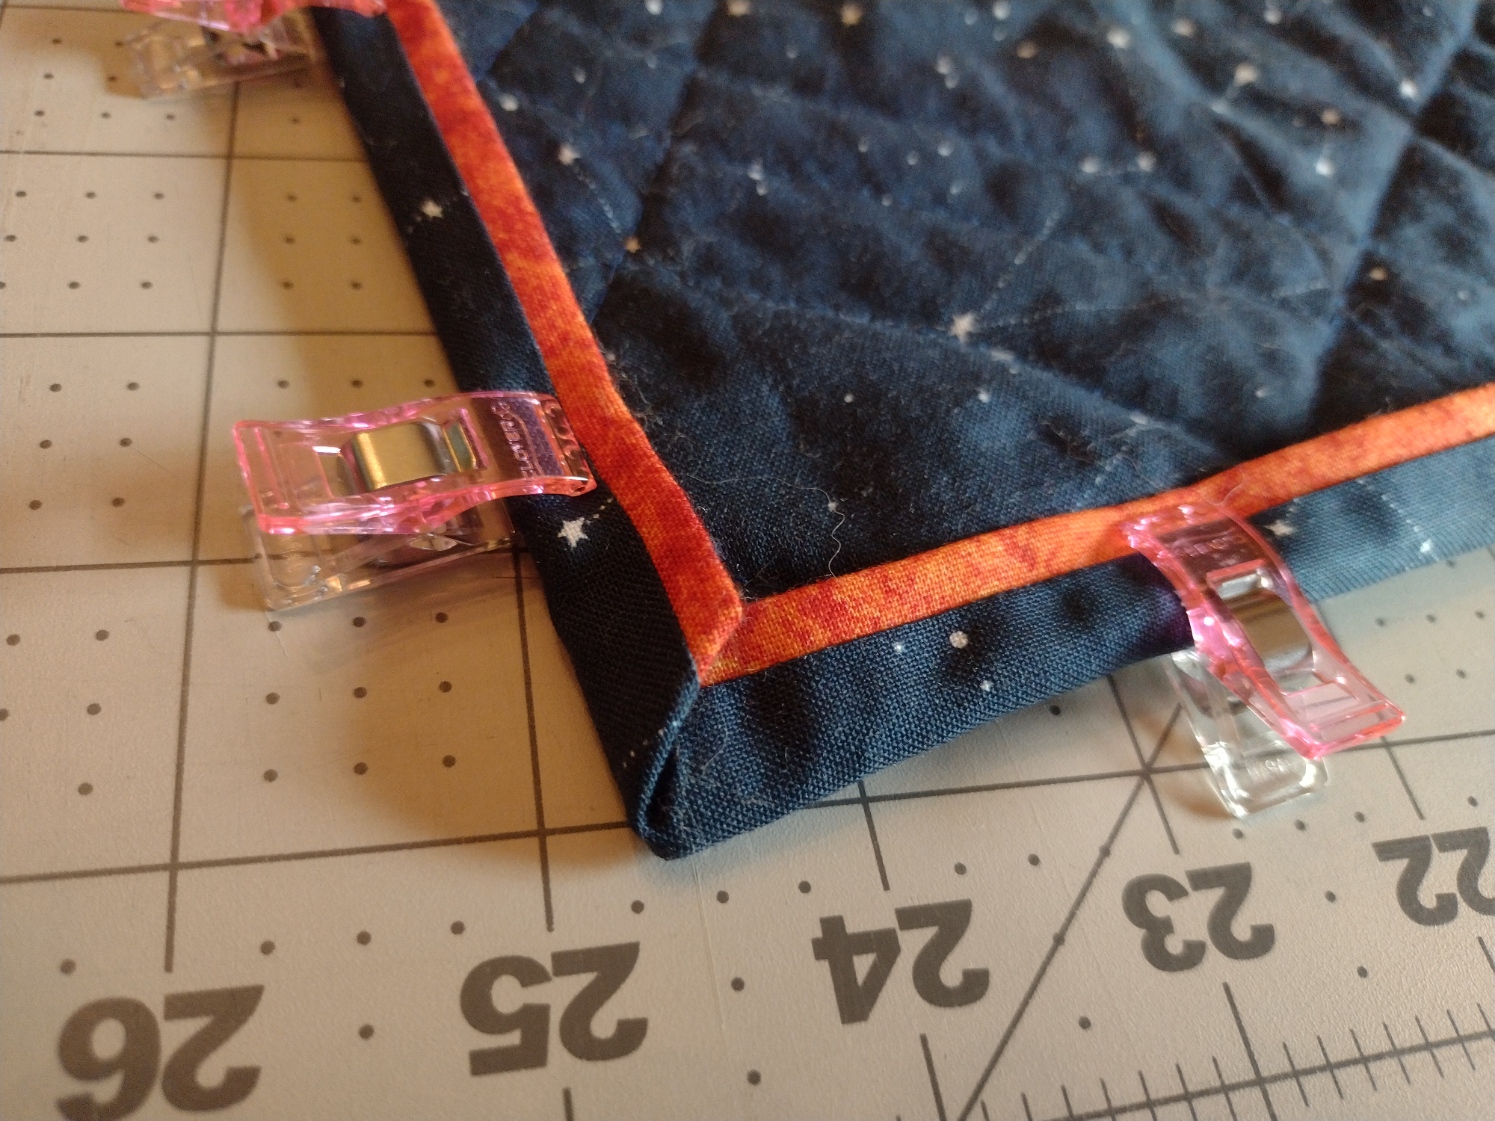
 

Continue around until it's all folded over and ready to sew down.

Your top thread should match the flange color and the bobbin should match your backing. I'm using Aurifil #2277 Light Red Orange on top and #2783 Medium Delft Blue in the bobbin.


You will stitch on the flange close to the outer binding. On this quilt the flange is the orange and the blue to the right is the outer binding.


Sew all the way around until you come to the beginning.


And you are done!!! On to the next project! who am I kidding, I have several going at a time! Doesn't everyone!!!


I hope you find this technique useful! I would love to hear how you do yours and if you ever tried to do it all by machine.


This is the You Tube video I watch when I try and remember how to join the binding...

https://www.youtube.com/watch?v=P1srfubwAIQ&list=PLGlIVNYaoGssyqUp9ZHIiUmQBCei_J1XO&index=7

Thank you for visiting and I hope to see you again!

Sheila


Sunday, March 7, 2021

March's OMG, Block Count And What Is My Latest Finishes

First my OMG for this month is to finish my Jelly Snowflake. I have the binding made and the top, back and batting sandwiched together. I just need to quilt it and bind it and then we can use it! Hopefully we will be able to use it this season...our weather has become a little warmer lately. I'm sure we will have at least one more snow before the weather changes for spring, at least that's what I hope! 


I highly recommend joining in on the OMG! It's a great motivator and you have a chance to win some awesome prizes!

Elm Street Quilts One Monthly Goal March Link-up


I'm also linking to Quilting Gail and her PHD, another great project completer motivator! I didn't complete any projects in February, but I'm set up to have at least 2 finishes this month!!! I'm very excited about that!!! One of the projects I will be completing this month is the Jelly Snowflake (above) and I'm currently finishing up the quilting on my son's Out Of This World quilt that he will be taking to college this fall...yes my baby is heading for college this year! A whole lot of mix emotions going on there! 

Here is the space quilt under the needle. I used Aurifil 40/3 #2110 Light Lemon and 50 wt #2783 Medium Delft Blue in the bobbin. For the outer border I switched to 50 wt #2780 Dark Delft Blue since the material was so dark.

and this is the back of the quilt. It's my first time using Minky and I love the feel and the look of the quilting on it.

And here are my bullet journal pages and my sweet model Duke!

Here he shows the projects I started this year...well I haven't actually started The color challenge yet, but I will this month!

 I am also counting my blocks and posting them with Prairie Moon Quilts. This month I only finished 23 blocks. That gives me a year total of 55. Spending time quilting the above quilt took time away from making blocks, but you have to get the projects done!

That and I think I need to either fix one of my sewing machines or buy a new one. I'm using my hand crank one and while it does stitch nice and help me keep things straight, it does stitch slow and my shoulder blade has been aching. 


Isn't she a beauty! I took this when I first got her in 2019. She is a Singer model #99 and was "born" on Nov. 28 1928. To the right is Sigmund my sea green sea monster! I call him a monster for a reason...He's a heavy machine!!! He is a Singer 185j and was born sometime in 1954. I loved sewing on him, but I wore him out and now I can't get him to sew past a certain point without having to push the wheel, then it will stitch until he gets to that point again. I need to get him up and running again, he stitches beautifully and I miss sewing on him.

Here is a breakdown of my block totals...
Five blocks were from the Jelly Snowflake, six blocks are from Home Is... QAL and 12 are from my Star Dancer quilt. I hope to get caught back up this month. I think I'm on target so far, but then it is the beginning of the month anything can go wrong!

These are who I'm linking to...

Elm Street Quilts  OMG

Quilting Gail PHD

Lizzie Lenard Vintage Sewing Free Motion Mavericks

Prairie Moon Quilts The 350 Blocks Projects

Check out these blogs and play along... It's a great way to get projects done, be inspired and have fun meeting new people!

See ya later!

Sheila

Saturday, January 30, 2021

Getting Back In The Groove

  And getting projects done! 

First my OMG for January... I'm so happy to say I finished it!!!! 


Here is a close ups of the quilting. I did a swirl with snowflakes/stars.

 
I used Aurifil 50 wt #4655 Storm at Sea, a variegated thread of blues and light grey. I can't tell you how happy I am to have this done and hanging on the wall! I've linked up with Free Motion Mavericks.
I was going to start on the Valentines heart everyone is working on, but it's a little larger than my quilt shelf and I don't want to put a lot of time in figuring out how to make it smaller.  

Did you get any UFO's done? Are you working on the Valentines heart? 

I am staying caught up with Pat Sloan's Home Is... QAL, but it's early and I usually do good until about the end. Mainly because I put off doing the setting blocks. Here are my blocks so far...

The first two are 14.5 x 14.5 and the third is 12.5 x 12.5 square.

And this past Wednesday has to be my most favorite! She has an applique template for a dog or cat and when I saw the dog template I thought immediately of Indy. 

He loved to sit on his hill, so I made my own template for the block.

This block measures in at 16.5 x 16.5 and went together very easily. I will add more detail to Indy either with fabric markers or thread, maybe both. I've been wanting to do thread painting and this may be the perfect project to get my feet wet. So we will see!

My next UFO I want to get done is the Jelly Snowflake. I believe I only have one round and the center, possibly 5 blocks. It would be nice to get that done while it's still cold out! I also would like to get my Out Of This World quilt quilted. It's for my son and it'll be the first one that I have made with minkie type material on the back. 

I have to post this pic...

It snowed! And Duke was enjoying himself. This picture makes me laugh and thought it would make you smile too.

I'll be posting in the next couple days, maybe tomorrow. I'll be linking up with The 350 Block Project, OMG, Free Motion Mavericks and PHD and I'll be posting more from my journal. I'll see you then! 

Sheila

Thursday, January 7, 2021

January's OMG, Latest QAL and More Bullet Journal

 Can you, as a quilter think of anything more exhilarating than the possibilities that a new bundle of fabric holds. Even more thrilling is the start of a new project, the fabric uncut, the placements of the fabric in that first block and in the case of a QAL, a mystery of what the future blocks may hold...

That's what I was feeling Wednesday morning! Pat Sloan's new QAL started called Home Is... I'm not much for applique, but if I want to grow as a quilter I have to work on building my skills. Her first block has a small applique heart on it and if you really don't want to attempt it you don't have to put it in. I chose to challenge myself! Here's my block 


and a close up of the applique heart.

I used Aurifil #2425 Bright Pink to stitch around the heart and I'm using Edyta Sitar's Sweet Sixteen fabric for this QAL. Don't you just love those little birdies!

Now onto my OMG for January...

Since I didn't complete my OMG for last month I'm carrying it over. I'm happy to say that I finally finished the third block! Only one left, then quilt, bind and done!

 Elm Street Quilts One Monthly Goal January Link-up

And that's my OMG this month it is the same as last month, complete the Merry Mini wall hanging... Get it quilted and binding on! I'm feeling pretty good about getting things accomplished this month. I hope it lasts all year! 

I had a few comments and interest on my bullet journal last post, so I thought I would talk more about how I use it with my quilting. I don't spend too much time drawing in it or making it too fancy. I need it to be a way of organizing my thoughts. I get overwhelmed if too much is swimming around my brain and have always found jotting down a To-Do list help settle me. But I would end up with post-it notes and scraps of papers getting lost which doesn't help keep my brain settled. I started to use a journal a few years ago and I'm still working on ways to make it work for me. Here is last years page of how I keep track of what needs to get done or what I decide not to work on or just save the patterns to.

Sometimes it helps remind me of upcoming QALs or let's me see I have way too much I want to do! I can also look at my list and figure out what I have to work on next. I use this along with the Project List that I shared last post. This breaks down the projects into how many blocks are in the quilt or when the next one comes out.

You don't need a fancy journal to keep track like this, just a notebook will do. I started out by using a binder with pages I printed out. It helped me figure out what I want to keep track of, what I don't and how I want to set things up. Last years journal was a little less artsy than the previous year, but I did use it to think up quilting ideas or blocks I'd like to try. I do like looking at some of the drawings I did in 2019 when I had a moment to play. Maybe I'll do more of those too!

If you have any questions I'd love to help! If you are interested in more of my pages let me know and I'll post them next time. I keep everything in my journals...dinner ideas, sew everyday tracker, yoga tracker, and my daily happenings along with quotes and whatever is interesting me at the moment. 

Until next time!

Sheila

For all the animal lovers...                     Me and Duke,

He has helped me heal with his gentle soul.

Wednesday, December 23, 2020

Getting Things Done...

 Though I really don't know how I am getting anything done!! A lot of the time I just sit in front of my machine, lost, dazed and confused! I know I'll pull myself back together, hopefully sooner instead of later!

I did finish my quilt top for Cozy Things QAL that Pat Sloan ran. You can get to the blocks from HERE. With this link you can also check out her next QAL, Home Is... that starts January 6, 2021 and runs until June 2, 2021. 

I have the backing and the binding ready. The binding is a diagonal peppermint candy stripe. I've never used striped binding and I really like the candy cane look of it. I can't wait to see it done! The backing is red polar fleece with white swirly snowflakes for cozy cuddling! I'm just waiting on the batting and I'll stitch up a quick swirly pattern to get it done and on the couch!

Another quilt I finished on December 6, but haven't posted yet is The Ultimate Beginner Quilt that Fat Quarter Shop ran a year ago July. You can find the pattern HERE. I used Finding Nemo and Finding Dory fabric that I found on clearance at Fat Quarter Shop. The quilt will go to a local charity as soon as I can find out where to go! Usually our guild handles that, but with them not meeting and my friend who has the contacts and used to take my quilts has moved! Bummer! Here it is... I'm calling it Finding Nemo/Dory.

I really like how this came out...I'm a lover of the ocean and I also love both Finding Nemo and Finding Dory movies. What can I say, I'm a kid at heart!!!

Here are some of the blocks close up to show the quilting. I did a swirly wavy pattern to mimic water. Some parts came out watery, some I just don't know! hahaha
I used Aurifil #4663 Baby Blue Eyes, a variegated thread, in both the top and bobbin.


My goal for next year is to get my patterns written up and available for you. I have several planned already, all in different stages of progress. My son will be going off to college in the fall and I'm hoping to help him out with the sales from my patterns. I hope you'll follow my blog so you won't miss my goings on!

I linked up with Pat Sloan, Wednesday Wait Loss and Free Motion Mavericks

Until next time...Just keep swimming, just keep swimming, just keep swimming,

Sheila